Full, native, layered files in one of three formats (PhotoShop .psd, Illustrator .ai, or InDesign .indd**)
We would prefer that the files be setup in CMYK color mode
Include a 2" bleed on all size (Setup Artboard to final print size and extend art 2" beyond)
All images must be at a minimum of 150 dpi at the output size
Place any images within the file as links and submit the images along
with the design files (unless submitted in PhotoShop in which case each
image should have its own layer)
*When saving an Illustrator file be sure that the box next to "Include
Linked Files" check box is NOT checked. You will need to provide the
image files along with the .AI file
All fonts must be outlined or converted to vector objects
Specify any Pantone (PMS) colors or spot colors where color matching is necessary
If PMS colors are not available but color matching is key, please provide printed sample to match
**For InDesign files you should choose File>Package to gather all
fonts and images linked within your file then submit the packaged folder
as a zipped or compressed file
Bella Creative File Upload instructions to upload your art:
Go to http://bellaexhibits.com
Click on “CLIENT LOGIN” upper right, above the What’s Hot” category on the main website.
Click the "CHECK" mark button at the bottom of the screen
Enter Your Client User Name: ( this is case sensitive and is individually assigned to your company)
Enter Your Client Password: (this is case sensitive and is individually assigned to your company)
Click the “Upload button” at the bottom of the screen below
Click the "Browse" button which will open your computer files. ( at the end of the "File" box on the right)
Select one file per line to upload and the file extension should appear in the “File" field:
Repeat step 8- 9 if you have additional files that you would like to upload.
Once you have finished selecting the files select the "Upload File(s)" button at the bottom of the screen.
Then this window will open and the file name(s) that you uploaded should appear in the box.
When you are finished. Click "Exit" and all the files should be successfully uploaded.
Please email This email address is being protected from spambots. You need JavaScript enabled to view it. when you have successfully completed the upload your files
The following guidelines are designed to help you set up your file so that there will be as few delays and problems as possible in the production of your job.
What size should my images be set up at?
Your file may be set up at any size as long as it is to scale with the final image size. Please indicate crop marks. To eliminate jagged edges on vector art, the Graphics Department suggests you design your Illustrator files at 800 dpi/800 in attributes for full size. When creating at 50% use 1600 dpi in output resolution from your document set up window. For example, when placing a small Vector image in Quark that will eventually be enlarged, it is recommended to set your output resolution at 9600 dpi/9600 attributes. These settings will ensure smooth curves on text and vector graphics.
What colors can I use in my layout?
Indicate color matches by specifying a PMS color that you would like to have matched.
What about fonts?
To avoid any problems with fonts, include all fonts all the time. PC and MAC fonts are not compatible. Therefore when working in a PC format, the Graphics Department requests that you convert all fonts to outlines. The Graphics Department may end up having to substitute fonts if the font is not supplied. Supplying MAC fonts is strongly recommended. Due to slight variations in fonts (kerning, baseline, etc) substituting fonts may slightly change the layout.
Can I use Transparencies and Shadow Features in Illustrator?
Illustrator has some nice design effects and features that work unpredictably with the Graphics Department's large format rip systems. Although some of these features are great for design, they increase the probability that what is produced is not what the designer intended. Shadows are a problem and the Graphics Department recommends these be achieved through PhotoShop. PhotoShop has some great new features, which work wonderful. Not only do some of these features in Illustrator increase turnaround time, but images are produced with unexpected results. Illustrator also includes new color management features that do not work as effectively as they do in Photoshop. The Graphics Department does not recommend you use these features in Illustrator. Sending any files created in Illustrator that do not contain any of the previously mentioned features is acceptable.
What do I need to do if I have a placed image in my document?
If your Illustrator document has placed images (logos and/or photos) in it, make sure that the original logo file or photo file is included on the disk. The Graphics Department does not recommend using embedded images (an image that has been placed into Illustrator but is not linked to the original file), as we have no way of knowing whether or not the original image is of high enough quality. Please provide a low-resolution .pdf for placement.
How should I save my file?
Save your document as a regular Illustrator file (.ai). There is no need to save it as an EPS. Saving an Illustrator file as an EPS can affect the Graphic Department's ability to use it, it makes the file larger than is needed.
What else do I need to send?
Please make sure your disk contains both the screen and the printer fonts. Along with your disk, also send a hard copy of all files that the Graphics Department will be producing, a printout of the contents of the disk, marking the files that will be used, and high resolution photos, if using a low resolution photo that is placed for position only.
Single or Multiple pages?
Q. My layout is for multiple mural panels, should I set my artwork up in separate pages? A. No, you should not set up any continuous images, ie. Multiple mural panel systems, in separate pages or files. In an effort to insure the best possible line-up of continuous images, the Graphics Department requests that all art be set up in one file. Precision tiling of your image will take place in our production process. The Graphics Department requests that you supply your images at the exact width. Of course, it is always a good idea to include the guides on all layouts to better communicate your expectations. In order to insure accurate line-up of all your mural graphics, a charge may be incurred to rebuild separate files into a single layout.
The following guidelines are designed to help you set up your file so that there will be as few delays and problems as possible in the production of your job.
What size should my images be set up at ?
Your file may be set up at any size as long as it is to scale. The Graphics Department recommends that the INPUT resolution of your file is a minimum of 100 ppi (at final size) for Digital Inkjet prints. As for Lambda prints, PhotoShop text in 6.0.1 or later is now Vector based, therefore if you set your file up at 100 ppi, your text will look great. But keep in mind that even low-resolution files will benefit from the high quality of Lambda output.
What colors can I use in my layout?
If you are requesting a specific element to be color matched in a bitmap file, please send the layered PhotoShop file along with that element on a separate layer. Additional comp time may be added for color matching to a flattened file.
What about fonts?
To avoid any problems with fonts, include all fonts all the time (make sure the screen fonts and the printer fonts are included). If you do not rasterize your type, please include all fonts used in the case that the text must be matched for color or changed in any way.
What resolution should my images be scanned at?
To achieve the best quality for your prints, scan your image so that it is 100 ppi at full size.
Should I send my files layered or flattened?
Always send layered files for last minute changes and/or corrections. Even minor corrections to a flattened file may incur composition time charges.
Can I send an image that needs to be scanned ?
Yes. The Graphics Department can scan images sent to us using either a flatbed scan (largest size: 8" x 10") or a drum scan (largest size: 8" x 10"). Drum scans are recommended for highly detailed images that will have a large finished size.
How should I save my file?
PhotoShop files should be saved in PhotoShop, TIFF or EPS file formats. Do not use DCS.
What else do I need to send?
Along with your disk, please send hard copy of all files that the Graphics Department will be producing. Also include a printout of the contents of the disk, marking the files that will be used.
Single or Multiple pages
Q. My layout is for multiple mural panels, should I set my artwork up in separate pages? A. No, you should not set up any continuous images, ie. Multiple mural panel systems, in separate pages or files. In an effort to insure the best possible line-up of continuous images, the Graphics Department requests that all art be set up in one file. Precision tiling of your image will take place in our production process. The Graphics Department requests that you supply your images at the exact width. Of course, it is always a good idea to include the guides on all layouts to better communicate your expectations. In order to insure accurate line-up of all your mural graphics, a charge may be incurred to rebuild separate files into a single layout.
There are two basic file formats for graphic images: Vector files and Bitmap files. The next few pages will cover some of the major differences between vector and bitmap files, as well as the advantages, disadvantages and other issues that need to be considered when creating files for graphic production.
Vector Graphics (lines):
These images consist of lines and curves that are defined by mathematical objects called vectors. Vector art is created by combining various geometric shapes, such as circles, triangles, or squares. In the diagram of the key, you can see all of the separate shapes that have been combined to create the entire image. Each of these shapes is an individual element that can be manipulated or scaled by itself or in conjunction with all others without any loss of quality.
Bitmap or Raster Graphics (images):
These images consist of colored squares, also called pixels. Bitmap images are created by combining a series of various colored pixels. The best analogy for a bitmap image is a child's toy called a LiteBrite. This is a board with a light behind it to show an image created by inserting translucent colored pegs. These pegs would be equivalent to a pixel in a bitmap image. The more pegs, or pixels in one inch of a row, the better the final image will look. If an image is created with enough pixels per inch, the eye loses its ability to see the individual pixels. Although vector and bitmap images are very different and have distinct advantages and disadvantages, neither format is better than the other. Which format you decide to use to create your graphics largely depends on the final result you are looking for. Many times you will use a combination of both file types.
Vector Images Uses:
Traditional graphics:
Vector art is the ideal file format for creating files for traditional graphics. The process used to create traditional graphics requires that every image be outlined so that the vinyl cutter can cut the various pieces. With a vector art file, this is extremely easy to do.
Digital graphics:
Vector images also work great for digital graphics as long as the desired result is not a photo-realistic image.
Color Issues:
The colors in a vector file can be changed or adjusted relatively easily. Either the entire image or just a portion of the image can be manipulated.
Advantages: • Images can be enlarged to any size without sacrificing quality. Because the art is resolution independent, meaning that there are no dots being used to create the image, there is nothing to limit its enlargement capabilities. Images can be reproduced at any size while maintaining crisp outlines and details. This makes them the ideal choice for type and other bold graphics, such as logos, which require clean lines that can be scaled to any size.
• Vectors are very compact information files, which means that the file sizes are typically going to be very small. This makes for easy and fast file transportation via modem or floppy disk. A vector file set up for a 4-panel mural may average 30-500 Kilobytes, whereas the same image created in a bitmap file can be 250-400 Megabytes - an increase of over 80,000%!
• Vector images can be manipulated very easily because each piece of the image is a separate/individual entity. This makes moving or resizing a portion of the image or the entire image itself very easy. Adding to and deleting from a vector image is also fairly simple to do.
Disadvantages:
• The biggest drawback to consider when working with vector graphics is that creating a complicated or photo-realistic image is very difficult and time consuming to do.
• When a photo is placed into a Vector program, it increases the size of the file. The Graphics Department recommends using F.P.O. files within Vector programs and send large photos separate.
Bitmap or Raster Images Uses:
Traditional graphics: Bitmap images are great for digital printing. They have the ability to produce both very detailed and photo-realistic or very simple images.
Digital graphics: Bitmap images can only be used for traditional graphic production if they are converted into a vector art file. To do this, the file is sent through a program that attempts to trace the lines it sees in the bitmap file. This will only work with simple images and still often requires clean-up, especially when type is present.
Color Issues: • CMYK or RGB files are acceptable. The Graphics Department will make sure and convert the images into the correct color space for the specific output devices. Keep in mind that using one of the generic color spaces provided on all PC and MAC computers will ensure accurate color conversion. The recommended color spaces are RGB S, color match RGB.ICC or PhotoShop 5 CMYK defaults.
• Adjusting the color of a bitmap image can be very difficult to do. In most cases, the color of one object cannot be adjusted without shifting the color of the entire image without extensive work to isolated areas and feathered selections.
Raster Software Adobe Photoshop Scanning pre-existing artwork and photos
Advantages:
• Accurate photo color management in PhotoShop.
• Vectors are very compact information files, which means that the file sizes are typically going to be very small. This makes for easy and fast file transportation via modem or floppy disk. A vector file set up for a 4-panel mural may average 30-500 KB, whereas the same image created in a bitmap file can be 250-400 MB.
• Preexisting artwork can be scanned (photos, slides, original artwork) to create a bitmap image. These can be produced either by themselves or combined to create a collage - depending on the desired result. Reliability - what you see at 100% is what you get.
Disadvantages:
• Manipulating a bitmap image can be very difficult to do. Although there are potentially thousands of individual pixels in each inch of the graphic, they all combine to form one single image. Isolating an individual pixel from all of the others is virtually impossible to do. This makes changing the layout, or removing from or adding to the image, a very time consuming and potentially difficult task. The more detailed and intricate an image is, the harder it is to do any kind of manipulation. Any changes that are made may be obvious if they are not done correctly.
• The file sizes of bitmap images can be very large, especially for mural panels and other large graphics. Information must be stored for every pixel in the image, which means that the larger the image is, the more information will be required from the scanner and the larger the file size will be.
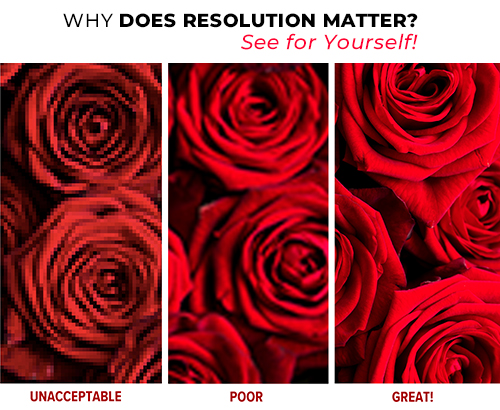
• Image enlargement is limited by the original size at which the file was created. If a file is produced at a size that is larger than its resolution will allow, the quality will decrease. Printing a low-resolution file will result in pixilation - large pixels that produce very coarse-looking output. As mentioned earlier, the eye eventually loses its ability to see the individual pixels if the resolution is high enough. Conversely, when a small bitmap image is enlarged, the pixels become more apparent to the eye. These low-resolution images look "choppy" or "built from blocks."